
Windows 10 Auto Login
With Windows 10 you can log into your PC faster by using a simple four-digit PIN. This feature was originally introduced in Windows 8 and it is still remains in the Windows 10. If you are the sole owner of your PC (meaning not shared with anyone) and you find that a PIN isn’t fast enough, you can set it to automatically sign in, too.
Important: For obvious security reasons, you don’t use this feature if you’re using a shared computer with multiple accounts in your household. Also, you don’t have this set up when using your Windows 10 laptop in a public location. But if you are alone and in a secure location, this does let you get going faster.
Automatically Sign into Windows 10
Method 1: Automatically logon in Windows 10 without password
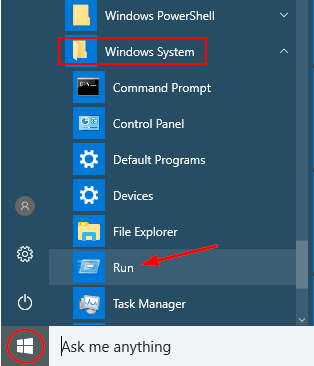
Step 1. You right-click the Start button and select Run from the hidden quick access menu, or you can use the keyboard shortcut Windows Key+R to bring up the Run dialog.
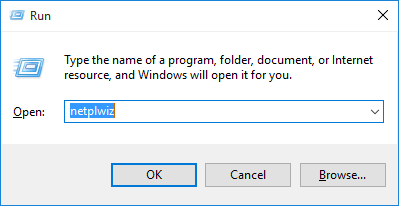
Step 2. Now you type: netplwiz and hit Enter or click OK.
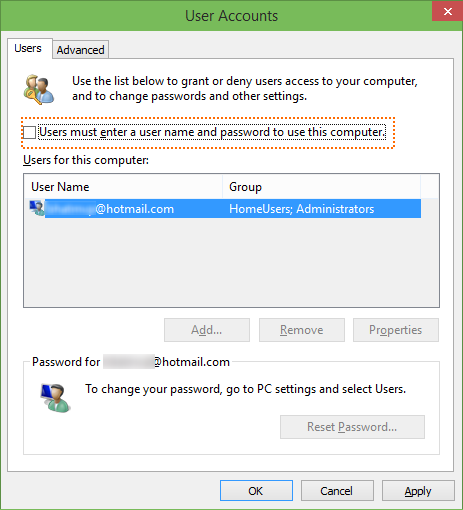
Step 3. Then you select your user account first and then you uncheck the option labeled Users must enter a user name and password to use this computer. You click Apply button to see Automatically sign in box.

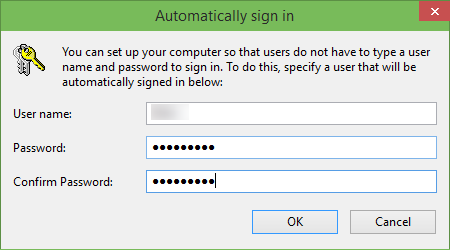
Step 4. In the dialog, you type your password and then re-enter the password to confirm the same.
That’s it! After you restart your system, you will still see the sign in screen, but won’t need to enter anything. This process bypasses the Lock Screen, too.
It’s also worth mentioning that you will still be able to lock your PC when you walk away from it by hitting Windows Key+L. If you want to get back into it, you will need to sign in with your password.
Again, you don’t have this enabled if you’re out and about with your Windows 10 computer in a public location or while traveling. You don’t want someone to have free access to all of your data.
Method 2: You use Registry Editor to turn on automatic logon
To use Registry Editor to turn on automatic logon, you follow these steps:
- You click Start, and then click Run.
- In the Open box, you type Regedt32.exe, and then press Enter.
- Locate the following subkey in the registry:
HKEY_LOCAL_MACHINE\SOFTWARE\Microsoft\Windows NT\CurrentVersion\Winlogon
- You double-click the DefaultUserName entry, type your user name, and then click OK.
- You double-click the DefaultPassword entry, type your password, and then click OK.Note If the DefaultPassword value doesn’t exist, it must be added. To add the value, you follow these steps:
- On the Edit menu, you click New, and then point to String Value.
- You type DefaultPassword, and then press Enter.
- You double-click DefaultPassword.
- In the Edit String dialog, you type your password and then click OK.
Note If no DefaultPassword string is specified, Windows automatically changes the value of the AutoAdminLogon key from 1 (true) to 0 (false), disabling the AutoAdminLogon feature.
- On the Edit menu, you click New, and then point to String Value.
- You type AutoAdminLogon, and then press Enter.
- You double-click AutoAdminLogon.
- In the Edit String dialog box, you type 1 and then click OK.
- You should add the DefaultDomain value if you have joined the computer to a domain, and the data for the value should be set as the fully qualified domain name (FQDN) of the domain.
- You exit Registry Editor.
- You click Start, click Shutdown, and then type a reason in the Comment text box.
- You click OK to turn off your computer.
- You restart your computer. You can now log on automatically.
Notes
- To bypass the AutoAdminLogon process and to log on as a different user, you press and hold the Shift key after you log off or after Windows restarts.
- This registry change doesn’t work if the Logon Banner value is defined on the server either by a Group Policy object (GPO) or by a local policy. When the policy is changed so that it does not affect the computer, the autologon feature works as expected.
- When EAS (Exchange Active Sync) password restrictions are active, the autologon feature does not work. This behavior is by design. This behavior is caused by a change in Windows 8.1 and doesn’t affect Windows 8 or earlier versions. To work around this behavior in Windows 8.1 and later versions, you remove the EAS policies in Control Panel.
- An interactive console logon that has a different user on the server changes the DefaultUserName registry entry as the last logged-on user indicator. AutoAdminLogon relies on the DefaultUserName entry to match the user and password. Therefore, it may fail. You can configure a shutdown script to set the correct DefaultUserName.
- You also can use the Sysinternals tool AutoLogon to enable this functionality easier. It also helps you to use an encrypted version of password.
Tag: windows 10 auto login, auto login windows 10, how to auto login windows 10
Read more:


