iTop Screen Recorder Review and Giveaway
Screen recording has become a vital tool for a variety of tasks in the current you’re making tutorial videos, documenting gameplay, conducting virtual digital era. Having a trustworthy screen recorder is crucial whether meetings, or streaming live content. Screen recording is used by businesses for tutorials as well as presentations, by educators for online lessons & by gamers to highlight their best moments. More than ever, there is a need for robust yet user-friendly screen capturing software.
That is where iTop Screen Recorder comes into play, a feature-rich and easy-to-use software designed with Windows users in mind. This screen recorder offers a smooth experience by combining powerful capabilities with simplicity, making it suitable for both personal & commercial use. iTop Screen Recorder has everything you need to easily record and share your screen, from capturing your desktop to making interesting tutorials with annotations.
Flexible Recording Modes
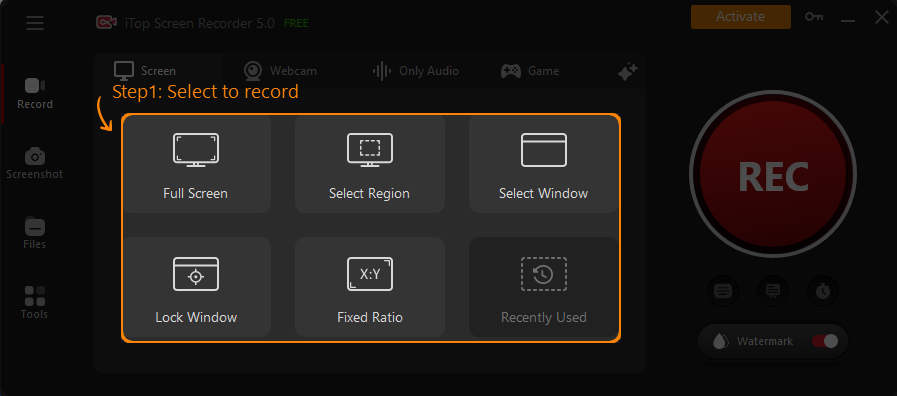
With its four flexible recording modes, iTop Screen Recorder is the perfect tool for a range of applications. This software can be used to record a specific window, capture the whole screen, or focus on one particular region. An overview of the main recording modes is provided below.
- Full Screen: Ideal for recording meetings, providing tutorials, or storing live streams, this feature allows you to capture any activity that appears on your screen. You can be confident that no aspect of your activity has been overlooked with the full-screen mode.
- Customized Area: This mode lets you pick and record just a section of your screen, which is great for situations where you need to concentrate on a particular piece of information without being distracted by other things on the screen.
- Specific Window: This feature is especially helpful for software demos and presentations as it allows you to record precisely the content that is shown in the window when you opt to capture a specific application window.
- Cam Recording: iTop Screen Recorder is an excellent tool for recording presentations, vlogs, and video answers since it lets you record straight from your camera. The webcam overlay can be precisely positioned and sized to match your content.
The ability to record screen, camera, & audio simultaneously is what distinguishes iTop Screen Recorder from the competition. This function allows you to record your screen, incorporate your face via the webcam, and record voice narration all at once, which is ideal for making more interesting and educational films. Because of this, it’s a one-stop shop for producing excellent video material without requiring extra applications.
Recording Screen and Designing Videos
The ease with which iTop Screen Recorder can record screen activity is one of its best qualities. The software makes it simple to record anything, including live streams, online meetings, and in-depth tutorials. You only need to click a few times to begin recording, and even inexperienced users will find it easy to use thanks to the user-friendly design. The option to select a specific window, a customizable area, or full screen allows you to concentrate on the stuff that is most important.
iTop Screen Recorder offers more than just simple screen recording; it also packs a robust annotation and painting toolkit to enhance your films. You can highlight important information when recording by using these tools, which include arrows, shapes, text, magnifier, eraser, and spotlight. For instance, you can use arrows or straight text comments on the screen to highlight particular areas of a tutorial or presentation. The magnifying tool lets you zoom in on crucial details to make sure nothing is missed, while the spotlight tool allows you to concentrate the viewer’s attention on a single location.
Webcam Recording with Virtual Background
With iTop Screen Recorder, users may record videos with a customizable camera overlay, elevating webcam recording to a new level. The camera overlay can be resized, positioned, and shaped to fit your material, whether you’re lecturing, presenting, or just filming a vlog. This adaptability makes sure you’re always visible in your recordings without taking away from the main content, giving you a polished and businesslike appearance.
The integrated teleprompter of iTop Screen Recorder is one of its most inventive features. With the help of this technology, you may read aloud from a script as you record, guaranteeing that your delivery is fluid and natural throughout the whole presentation. You can concentrate on presenting the content without being concerned about forgetting a word thanks to the auto-scroll feature. Because of this, iTop is a great option for producing expert webinars, video tutorials, and presentations.
Advanced virtual background choices are available in iTop Screen Recorder to further improve your webcam recordings. With the software, you can easily blur, change, or delete your background, whether you’re filming in a busy place or want to keep your privacy intact. With the aid of this tool, you can make a presentation that is both more visually appealing and focused while also lowering distractions. Controlling your background helps to keep viewers’ attention on you and the content you’re giving, even if you’re working from home or filming in less-than-ideal conditions.
How to Use iTop Screen Recorder: Step-by-Step Guide
You can easily create high-quality videos using iTop Screen Recorder by following these simple steps, from setup to the finished product.
1. Set Up Preferences
Before you start recording, it’s important to configure your recording settings based on your needs.
• Select Recording Area: You have the option to record a customizable area, a single window, or the entire screen. This adaptability guarantees you get the exact information you require.
• Audio and camera Settings: Select whether to record audio from the system or a microphone, as well as whether to add a camera overlay. For the ideal configuration, change the webcam’s size and location.
• Other Preferences: Look at other choices such as picking the video format, turning on hardware acceleration for slicker performance, and setting shortcuts for easy control when recording.
2. Record the Screen
Once your preferences are set:
• Start Recording: To start recording what’s happening on your screen, click the record button. Even while you’re concurrently using the webcam and filming in high definition, iTop Screen Recorder guarantees lag-free, seamless performance.
• Use Annotation Tools: You can add text, arrows, and highlights to your video as it’s being recorded to help make it more interesting and educational.
3. Save and Edit
After completing your recording:
• Save the Video: To ensure cross-platform compatibility, you may save your video to a well-known format, such as MP4, AVI, or FLV.
• Modify Your video: Make easy edits with the integrated editor, such as chopping, trimming, or combining clips. This enables you to refine your video before posting it online or distributing it.
Special Giveaway
Don’t miss out on this incredible opportunity to experience the power of iTop Screen Recorder for free! Download the software now and enter the giveaway license key below for a try.
*Special Giveaway: Install and Active it with this key(Limited giveaway for the first 100 readers): F5CCA-79A26-251ED-56645
You can buy iTop Screen Recorder key with coupon 50% off here:
With iTop Screen Recorder, you’ll be able to capture your screen in high-quality video and audio, making it perfect for tutorials, presentations, and more. So what are you waiting for? Download iTop Screen Recorder today and start creating amazing content!


