Checkboxes are a great way to make your Excel spreadsheets more interactive and user-friendly. Whether you’re creating a to-do list, a project tracker, or a survey form, adding checkboxes allows you to easily mark completed tasks or toggle options on and off.
In this guide, you’ll learn how to add a checkbox in Excel — step by step — along with a few tips to make them work perfectly.
🧩 What Is a Checkbox in Excel?
A checkbox in Excel is a small square box that can be checked (☑) or unchecked (☐). It’s an interactive form control that links to a cell and returns either TRUE (if checked) or FALSE (if unchecked).
Checkboxes are especially useful in:
Task or to-do lists
Progress trackers
Forms and surveys
Dashboards with interactive filtering
✅ How to Add a Checkbox in Excel (Step-by-Step)
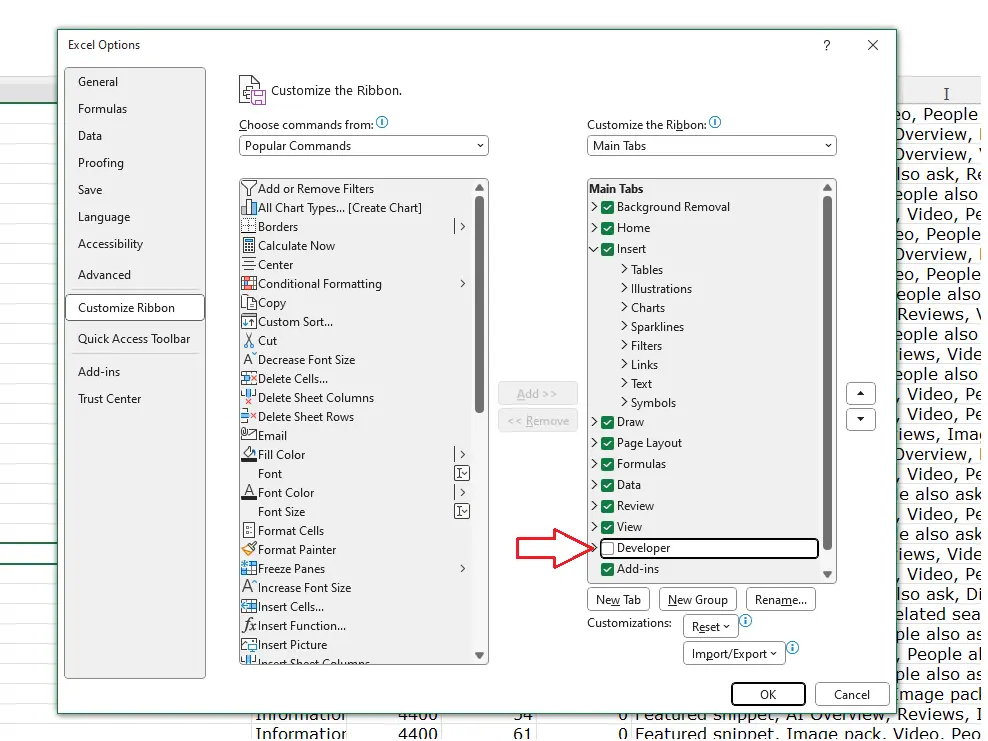
Step 1: Enable the Developer Tab
By default, the Developer tab (where checkboxes live) is hidden in Excel. Here’s how to enable it:
Go to the File tab → select Options.
In the Excel Options window, choose Customize Ribbon.
On the right side, check the box next to Developer.
Click OK.
You’ll now see a new Developer tab on the Excel ribbon.
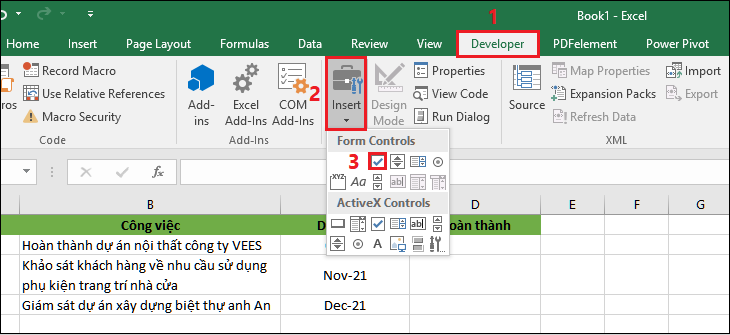
Step 2: Insert a Checkbox
Click the Developer tab.
In the Controls group, click Insert.
Under Form Controls, click the Checkbox (✔) icon.
Click anywhere on the worksheet where you want to place the checkbox.
You’ve just added your first checkbox!
Step 3: Format or Rename the Checkbox
By default, Excel labels the checkbox as “Check Box 1”. To rename or remove this label:
Right-click the checkbox and choose Edit Text.
Type a new label (e.g., “Task Completed”) or delete the text if you want only the box.
You can also move or resize the checkbox by dragging its edges.
Step 4: Link the Checkbox to a Cell
To make your checkbox functional (so Excel knows whether it’s checked or not):
Right-click the checkbox and select Format Control.
In the Control tab, find the Cell link box.
Click inside it, then click on the cell where you want the checkbox’s value to appear (for example, B2).
Click OK.
Now, when you check or uncheck the box, the linked cell will show TRUE or FALSE.
💡 Bonus Tips: How to Use Checkboxes Effectively
1. Create a To-Do List
You can use checkboxes to mark completed tasks. Example formula:
=IF(B2=TRUE, "Done", "Pending")
2. Apply Conditional Formatting
Highlight tasks automatically when checked:
Select your task range.
Go to Home → Conditional Formatting → New Rule → Use a formula.
Enter:
=$B2=TRUE
4. Set a formatting style (like strikethrough or green fill).
3. Copy Checkboxes Quickly
To add multiple checkboxes:
Select the existing checkbox.
Hover over its lower-right corner until the cursor becomes a small cross.
Drag it down to duplicate across rows.
⚙️ Troubleshooting Common Issues
Problem
Solution
Can’t find Developer tab
Make sure it’s enabled under File → Options → Customize Ribbon.
Checkbox doesn’t move with cell
Right-click → Format Control → Properties → select Move and size with cells.
Checkbox not clickable
Ensure it’s a Form Control, not an ActiveX Control.
Final Thoughts
Adding checkboxes in Excel is simple yet powerful. They can transform your basic spreadsheets into dynamic tools for tracking, managing, and automating tasks. Once you’ve mastered linking checkboxes to formulas and conditional formatting, you can build interactive dashboards, task lists, and even mini apps right inside Excel.


")
")
")

")